
This is the English version of my last article on my blog. It used to share experience on using APRS4r at Raspberry Pi to foreign Ham.
According my previous articles on my blog about I-Gate. The fixed station is used Asus wl-500gp and installs the APRS4r. The mobile one is used Asus mobile phone P535 with aprsisce. However, the hardware requested are discontinued for several years, hard to found even in the 2nd hand market. The visitor of my blog just know what I had do, but difficult to follow my step to setup their own I-Gate.
While discuss with local hams to promote APRS activities in Hong Kong, my opinion is that setup I-Gates are essential factor. It is an infrastructure which similar to 3G network by telco, public WiFi network setup by government.
Hong Kong is a very small city, and broadband Internet connection to home almost 100%. An APRS mesh network can be formed locally, if hams setup their I-Gate at home. Onces number of I-Gate increase, we built up a RF<=>Internet ham network, for the message, email as well as GPS data; whatever, you are on road (via handheld, or smartphone), home base(via RF device or PC/w Internet connection) or office (via PC/w internet connection).
The cooperation of Radio and Internet is the future of Ham Radio, and it is the aim of my blog to encourage, sharing experience on it.
For the tracker, there already many kits available on the market, and some Japanese handheld was built in. Obtain of APRS tracker no longer a critical point.

Mesh Network concept

courtesy of Cisco,every node is an I-Gate
Why Raspberry Pi ?
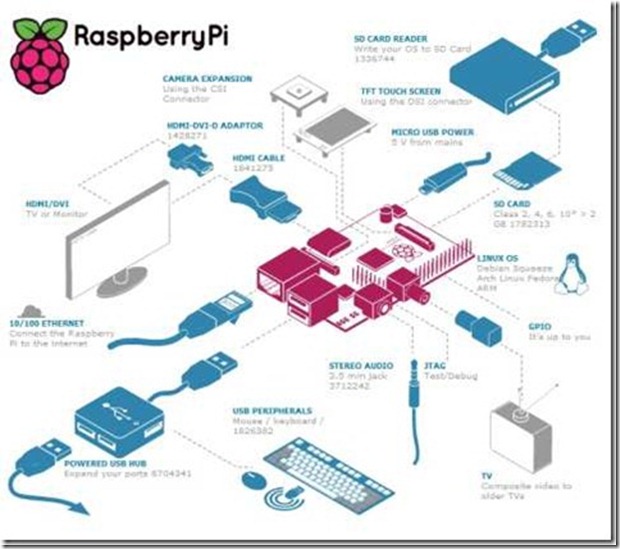
courtesy of Element14 web
The advantage of using RPI as an I-Gate:
- The price is cheap, fulfill ham’s need. I don’t think Ham activity is a hobby of rich people. We should consider use less money to do more things, just like QRP activity, less power to the longest distance.
- The OS of RPI is Debian, which is the testing platform of APRS4r.
- It is under mass production, although the lead time from RS components, elment14 quite are quite long
- The power consumption is 700mA, 5V; 3.5W only. Less than router, suitable for 24 X 7 operation. We may consider to use battery, or solar power if necessary.
- The size of RPI similar to a credit card. It save space, and more suitable for mobile I-Gate, when compare with a router
The RPI is an education purpose kit. If ham is interested on HW programming, it is a platform to do so. However, there are NO Audio input; it request extra circuit if want to integrate KISS mode TNC to RPI.
Preparation, remind note:
I spent 4 evening to setup the RPI OS and APRS4r, Here is the brief:
- Most of the problem formed by the self-prepared accessories
- The Power adaptor should supply current 750mA or above. If the micro USB cord is separate from the adaptor, ensure it should pass through high current (thick cable). I used an old Nokia micro USB cord, and the RPI reboot again & again. Later I changed to another USB cord which for my smartphone, and the RPI boot up successfully. The following photo is the Nokia cable; do not use it if you got one.

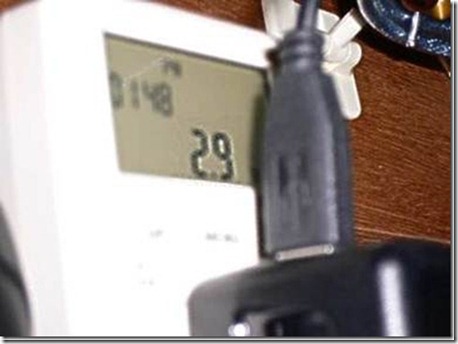
The normal power consumption is approx 2.9W
- DO NOT get power from PC USB port, the max current of USB 2.0 port is 500mA only
- I am using SanDisk SDHC 4G class4 SD card. Please refer the RPI FAQ for the compatible list
- Do not use too old accessories; I used an IBM USB mouse, but no response. I changed to a newer Dell one & it works.
Preparation of OS Debian image to SD card
Please follow the guide line from RPI official page. The size of SD card should be 2G or above.
Installation of OS Debian to RPI
This is the first screen:
It is text mode Linux interface. The mouse is not work. Please use “Tab” for selection.
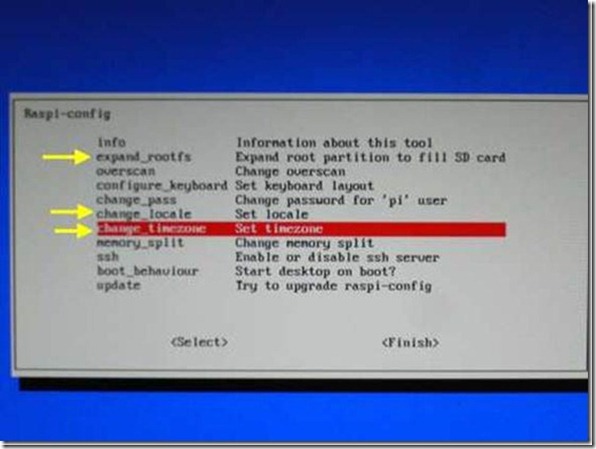
expand_rootfs, If the SD card will be used on the RPI permanently, select this option to expand use all space of the card.
change_ locale,select appropriate locale for your area/region. DO NOT select all, it spend long long time for the locale installation.

Change_time zone,RPI did not equipped Real Time Clock. You should select appropriate timezone for your area.
Then the RPI will reboot after installation complete.
Default login & password:
login: pi
password: raspberry
Steps to install APRS 4 r:
In fact it is according the debian installation guide from APRS4r official site. Please be reminding the use access right during installation.
Unless you are fluent on Linux command, e.g. sudo bash; otherwise please follow the below steps carefully. All the Linux command should add “sudo”
sudo apt-get update
sudo apt-get install ruby1.8 ruby1.8-dev
sudo apt-get install liblog4r-ruby1.8
sudo apt-get install libserialport-ruby1.8
The above command is used to update the OS and install the Ruby and it’s library.
We need add the APRS4r source url, to tell the OS download the package. As I had found the vi editor had bug when I use the RPI emulator, so I handle it in X windows this time.
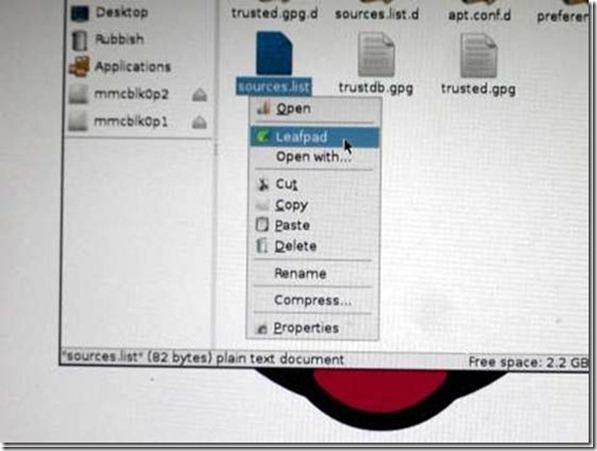
Please enter the X windows by command “sudo startx”, then use the editor leafad to open
/etc/apt/sources.list,then add he following address:
deb http://www.aprs4r.org/debian stable/
Save the file, and logout the X windows. Propose reboot the system. The command to reboot the system is:
sudo reboot
After reboot, please enter the following commands carefully. Select “ Yes” for all questions.
sudo apt-get update
sudo apt-get install aprs4r
sudo apt-get install aprs4r-web
sudo apt-get install aprs4web
The installation of APRS4r is complete.
Express setup method of APRS4r under Debian
Unless you are fluent on German, otherwise the German GUI are the harder problem. I had developed an express method to overcome the German GUI. The steps:
Please markdown the assigned RPI IP address first, it should be shown on the login screen. Then please login the X windows by “sudo startx”. Please open a Internet browser.
Please enter the URL. It is http://YOUR IP ADDRESS:8085 。E.g.: Your IP is 192. 168.1.2 ,Your URL is http://192.168.1.2:8085 。
APRS4r will prompt the login dialog box. The default login name & password is “aprs4r”.Then please click the first row.
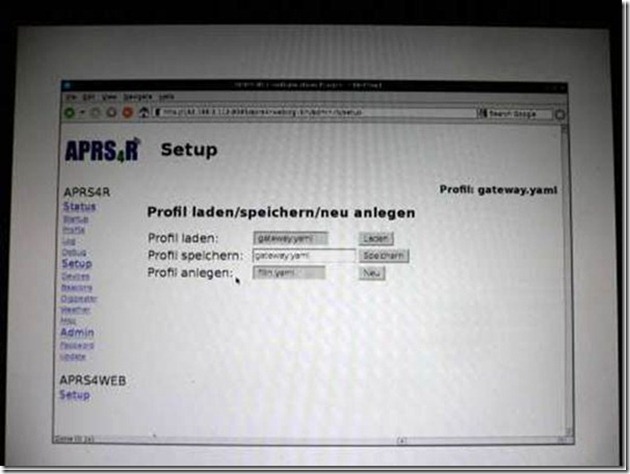
You will arrived the setup screen. Please select the “setup” on the left column. Then on the 3rd option,(Profil anlegen: ), select” gateway.yaml”, then press right button “Neu” once.
The 2nd option file name should change to “gateway.yaml”. Ensure the “gateway.yaml “should appear on the right top side. The first step was complete.
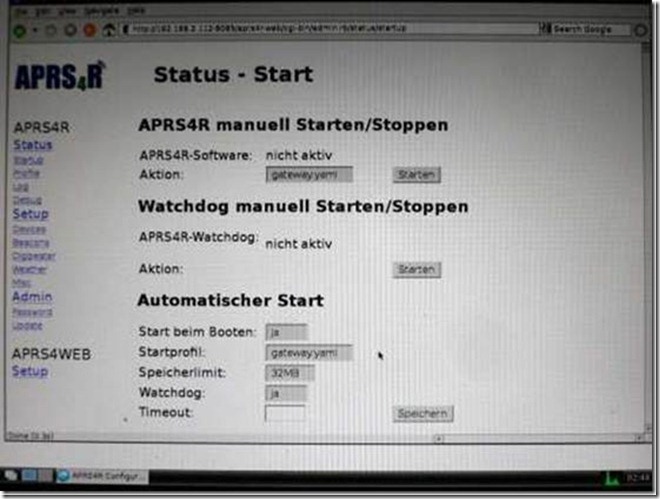
This is second step, please select the “Startup” on the left column , and click the button “starten” to auto start the default profile “gateway.yaml” and “watchdag” during boot up. The “start beim Booten” and “watchdog” of “mautomatischer” set to “ ja”.
Ram assignment “Speicherillmit” select to 32MB. The 2nd step complete.
German basic knowledge:
§ Nein => No
§ Ja => Yes
Please logout the X windows, and reboot. You will found the message “gateway.yaml not found”. Your previous job was success.

Please use “sudo startx” to start X windows, then enter a Internet browser. Go to the following URL to download the file I prepared for you. Please save it to path: /etc/aprs4r/
It is the basic feature profile. For the other advanced feature such as digipeater, or PHG information, you can add by yourself when need.
Open the saved gateway.yaml profile by Leapad. Please edit the following rows:
YOURCALLSIGN,change to your callsign。SS ID is -10
Payload includes the following information,
payload: “!2200.00N/11400.00EzAPRS4R IGATE YOUR MESSAGE“
2200.00N/11400.00E => latitude / longitude;Please change to your location
The separate symbol of latitude and longitude is used to select the icon table.
” / “is Primary Table
” \ “is Secondary Table
z => the code of the Icon
APRS4R IGATE is the HW/SW identity message, please do not change it.
YOUR MESSAGE is the rest information you want told the other, for example, standby freq, Igate info, and so on.
The following link is the ICON table chart.
http://ptm2.cc.utu.fi/ftp/HAM/digi/APRS/APRS_Symbol_Chart.pdf
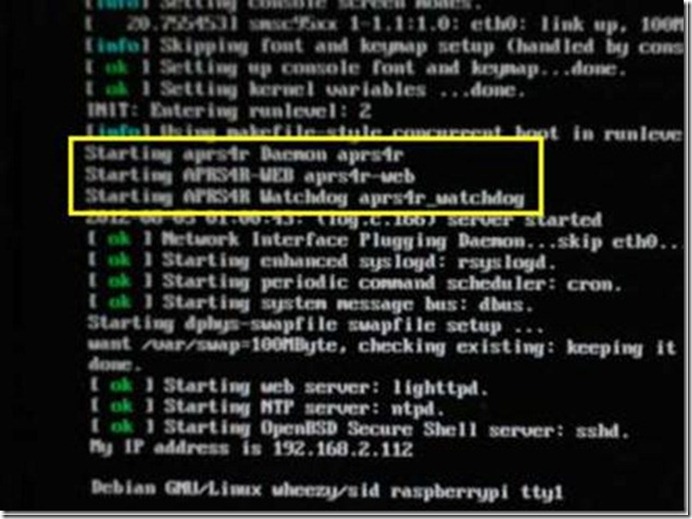
After change above information and save, please reboot the system. Your will found the messages APRS4r is starting. It works now ! No need any login.
Some basic knowledge of Linux:
Although unplug the power will shut down the system obviously, I recommend to shutdown the system by command if under an controlled environment, say at home base. The command is: “sudo shutdown –h now”

Testing
The testing period was completed and result was satisfied. The Asus WL-500GP router was retired and now the VR2XKP-10 is work at RPI. Bingo !

Problem, Other concerns
Case/Enclosures
RPI is PCBA, no holes for fix purpose. It is not an good idea. Yes, there are many enclosures available on Web, but the costs are expensive. The RS component, element14 provide enclosures at reasonable price, but the lead time is very long. I had order 3 enclosures and the scheduled delivery date is end of September.
How to protect the RPI before the enclosures arrived ? I found some RPI fans make a Paper mold up in PDF format, simply printout, cut & fold a case for RPI it in a plastic sheet. Link:
http://pdfcast.org/pdf/raspberry-pi-card-case-revision-1
Heat Dissipation
Again, RPI is PCBA which without any mechanism for heat dissipation. I had measured the temperature inside the DIY plastic enclosure, and result 45.6℃ . you may consider add heat sinks for the 2 chips and the regulator if operate 24X7.

APRS4r log file missing in Web GUI
The log file name is different with router one. It located in /var/log/aprs4r/aprs4rxxxx.log .
Function extension:
The HW specification of RPI is fulfilling most Ham projects need. You may consider:
- Use a GPIO to flash a LED as a watchdog. It also is the 1st lesson of programming the RPI.
- Use another GPIO as a remote control pin to on/off the transreceiver. It may need the BB router port forwarding to RPI IP address
- The RPI equipped I2C pin. It may interfaced to RTC DS1307, ADC. The ADC may be used as input voltage detector, and thermometer by LM35
- The UART port may be connect to GPS module
- KISS mode TNC. If the KISS mode TNC can be integrated on RPI, it is great.
- Be a mobile I-Gate. As mentioned before, the RPI is credit card size. If it can talked with a 3G USB dongle for Internet conneciton, it will became a mobile I-Gate. However, the current of the RPI USB port is approx 100mA only, I need check the 3G USB dongle current consumption before action.
My original plan to use AVRnet as IGate, but the priority of this project reduces to low now.
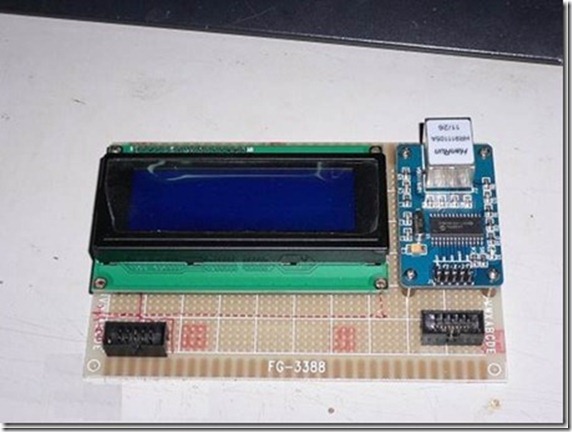
My prototype of AVRnet, Not completed
It used AVR ATMega32 MCU, and SPI interface to Microchip ENC28J60 for ethernet connection. I had monitor my IGate traffic for several months, the traffic rate is very low, and should be handled by MCU project.
Link: http://www.avrportal.com/?page=avrnet
Other things need for I-Gate
Using Raspberry Pi as a IGate, you also need:
- KISS Mode TNC. Some new tracker kits provide KISS mode TNC firmware. And if affordable, you may consider OT2M or 3M for long term 24X7 operations. I am using the cheapest method, DIY the TNC-X .
- USB to RS232 Cable,RPI support FTDI from USA and PL2303 from Taiwan. I had tested the following 2 cable which used PL2303 chipset and they worked with RPI.


- Transreceiver. Handheld or Vehicle type is suitable for I-Gate
Conclusion
I had order the other set of RPI, for advanced setting test. And I also want to try Xastir which foreign ham used.
And so far I did not found any information from web about use APRS4r on Raspberry PI platform, hope this article helpful to you.
Further Reading
My second iGate article:


Hi Francis hello there wow you make a nice setup, I like to try this also later
I am new since 1 week with a Raspberry Pi
PS: I was the person who make the very first APRS station in your country about 8-9 years ago
73 Art I have Skype ID: ja1ogs
Hi JA1OGS
Glad to meet you at my blog. I found your web include some info on SDR, I also interest it. Hope to sharin experience with you on these topic.
Hi Francis, thanks for the great info. I followed your instructions and got the APRS to work with the RPI. Problem is, when I edited the gateway.yaml file, somehow didn’t save it the first time so got the default QTH 2200N 11400E! Again edited the file but still not updating the info on aprs.fi. Status says it is active and starts automagically on bootup but still getting old info. APRS4R-Log says Keine Daten in /var/log/aprs4r/aprs4r.log gefunden (no data found). Seems like its running, but not updating. Any clues? 73, Peter VK4QC
Your may consider setup FTP service on Raspberry Pi. And edit the yaml file in windows plaform, then upload to the RPi. If the new yaml uploaded, reboot the Rpi to load the new yaml file.
FTP setup to Rpi:
http://www.instructables.com/id/Raspberry-Pi-Web-Server/step9/Install-an-FTP-server/
Yes, it worked! I used putty and VNC from my windows PC. Many thanks!
Have Fun ! Enjoy it.
Hi trying to follow your instructions to install aprs4r, but get error message "unable to locate package aprs4web" when i try to carry out sudo apt-get install aprs4web. any help would be appricated. thanks
Ops ignore previous message kept doing same typo….
I have an TH-D7 hand held and I like to make it cooperate with my Raspberry for an iGate. Can you pse help me ???
Thanks in advance.
SV5BYR
Mike
PS pse answer me on my mail too
Hi.
Use XASTIR and follow their instructions on their site: http://www.xastir.org/wiki/Main_Page
73's
Hi to all, the contents present at this web site are actually awesome for people
experience, well, keep up the good work fellows.
sudo apt-get install aprs4r
after this stage
E: Unable to locate package aprs4r
will showing what to do? next
Hi
Before the installation, please type the following command to update the sw, ensure the network connection is enabled.
sudo apt-get update && sudo apt-get upgrade
hi GM
after install all I enter http:/192.1xx.x.x”8085
it will show ” 500 – Internal Server Error ”
Y ? and what I have to do pls give info
thanks
that is “http://192.1xx.x.:8085
Hello
No “.” before “:” .e.g: 192.168.2.15:8085 .
HI OK
IT IS http://192.1xx.x.xx:8085
the log in will open after that the error will show
it will show ” 500 – Internal Server Error ”
Hello
Assume your IP address is correct, it means the web server service did not start up. re-try the command and seems any error, then re-boot your Rpi.
sudo apt-get install aprs4r-web
sudo apt-get install aprs4web
If it still not work, please told which OS version you use.